
Install MDE with SaltStack
MDE for Linux has serveral articles about using common deployment tools, but recently I was asked about using SaltStack which was a tool I'm not familiar with and that lacks/lacked official documentation.
What is SaltStack
I’ll sumarize, but if you don’t know about SaltStack then you should check out their web site.
SaltStack is a configuration management platform that uses a Master-Child, Master & Minion in Salt terms, and enables a wide range of capabilities like executing commands across multiple systems or defining a desired set of states for machines to meet and have them performed/applied. Salt works across many different platforms and even includes modules that allow you to manage Cloud configurations and capabilities. It is very similar to other tools like Ansible and Puppet and thanks to the community has lots of great examples and documentation about how to get started.
The remainder of this blog is going to assume you have a working knowledge of Salt, not extensive or advanced because to be honest I don’t feel I have that skill level yet. However, I can Google, Copy & Paste, and beat my head against a wall to make things work so if you can too you’ll be able to follow along as well.
If you need help getting started with Salt you can begin here.
What we need to get MDE installed
The basics of installing MDE on Linux are:
- Install Pre-requiste packages like
apt-transport-https,libplist-util, and others (depending on your OS) - Add the MDE package repository to your distribution
- Add the MDE package repository keys/certs to your trusted list of certs/keys
- Install the MDE package
- Onboard the device to MDE
- (Optional) Configure things like AV scans, exclusions, etc. on the machine
The manual process to install MDE can be found here and it provides a good set of steps that can be really easily converted to SaltStack Commands.
command line:
> curl -o /etc/apt/sources.list.d/microsoft-[channel].list https://packages.microsoft.com/config/[distro]/[version]/[channel].list
saltstack command line:
> salt '*' cmd.run 'curl -o /etc/apt/sources.list.d/microsoft-[channel].list https://packages.microsoft.com/config/[distro]/[version]/[channel].list'
So, pretty simple and we could basically take the entire manual process and do this with success.
A Salt-ier Way?
Yeah, I couldn’t resist sorry.
Rather than just converting command lines to SaltStack command lines, there are some SaltStack capabilities we can use that will make this process a lot easier and managable.
The SaltStack State File
First, using SaltStack’s state capability we can define everything we need in order to successfully deploy MDE on our machines and then apply this to all of the minions. While SaltStack supports the idea of modularity in the State capability the reality is that to deploy MDE we don’t actually require many steps, so rather than creating individual files I chose to create a single Install state file. SaltStack uses a YAML syntax with a .sls extensions for the state files, and these should be hosted on the Salt Master in the /srv/salt folder (other storage places can be used, but not for this example).
> cat /srv/salt/install_mde.sls
SaltStack Package Management for Pre-reqs
Next, we will begin with the Pre-reqs that are needed. Per the manual documentation for Debian the packages curl,libplist-utils,gpg,gnupg,and apt-transport-https are or may be required, so we can use the SaltStack pkg module to tell Salt to ensure these are installed as a first step.
install_mde.sls:
install_prereqs:
  pkg.installed:
    - pkgs:
      - curl
      - libplist-utils
      - gpg
      - gnupg
      - apt-transport-https
SaltStack Repository Management to Add MDE Package Repository
After the Pre-Reqs we can then add the MDE repository and keys using SaltStack pkgrepo module so we can successfully get and install the MDE package.
install_mde.sls:
add_mde_repo:
  pkgrepo.managed:
    - humanname: Microsoft Defender
    - name: deb [arch=amd64,armhf,arm64] https://packages.microsoft.com/[distro]/[version]/[channel] [codename] main
    - dist: [codename]
    - file: /etc/apt/sources.list.d/microsoft-[channel].list
    - key_url: https://packages.microsoft.com/keys/microsoft.asc
    - refresh: true
The name field above is used by SaltStack as the Repo ID as well as what is stored in the source list file location, and will be distribution unique (Debian is shown). The key_url is used for Debian systems to acquire the signing keys for valiation of trusted packages. Other distributions like RedHat will use a different key settings. Using refresh ensures that the Debian Package Manager has re-read the list of valid package repositories so when we attempt to use the MS repository it will be ready for the system.
SaltStack Package Management to Add MDE Package Install
Now we can perform the installation of the MDE package. Like the pre-reqs we will use the pkg module to ensure the MDE package is installed on the machine(s).
install_mde.sls:
install_mde:
  pkg.installed:
    - name: mdatp
    - required: add_mde_repo
Since we don’t have a list of packages to install rather than using the pkgs list we can use the name parameter and provide the mdatp package name for our MDE install package. In addition, the use of required tells SaltStack that the add_mde_repo state must have been completed before this state can be performed. This helps ensure the repository is available to the system before trying to add MDE’s package.
Get MDE Onboarding File
Next we want to onboard our machine to MDE, but in order to do this you need the onboarding file from the Microsoft Security Portal.
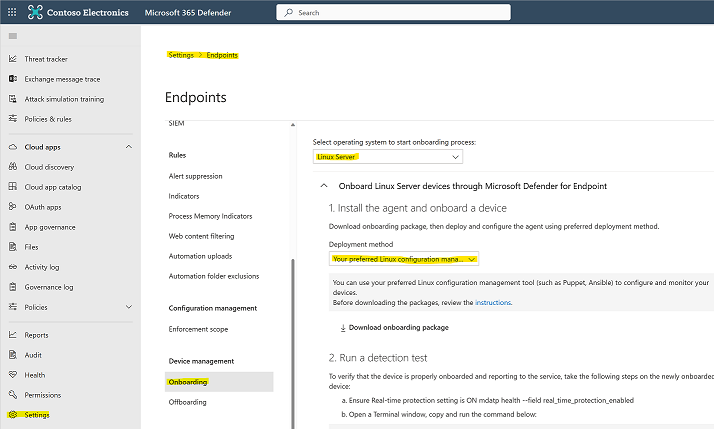
Download the onboarding package from Microsoft 365 Defender portal:
- In Microsoft 365 Defender portal, go to Settings > Endpoints > Device management > Onboarding.
- In the first drop-down menu, select Linux Server as the operating system. In the second drop-down menu, select Your preferred Linux configuration management tool as the deployment method.
- Select Download onboarding package. Save the file as WindowsDefenderATPOnboardingPackage.zip.
- On the SaltStack Master create an
mdefolder in the default Salt File storage for MDE
> mkdir /srv/salt/mde
- On the SaltStack Master extract the contents of the archive to the SaltStack Server’s folder
/srv/salt/mde:
> ls -l

total 8
-rw-r--r-- 1 test  staff  4984 Feb 18 11:22 WindowsDefenderATPOnboardingPackage.zip

> unzip WindowsDefenderATPOnboardingPackage.zip -d /srv/salt/mde

Archive:  WindowsDefenderATPOnboardingPackage.zip
inflating: /srv/salt/mde/mdatp_onboard.json
SaltStack File Managed to Push Onboarding File to Minions
Finally, pushing the MDE Onboarding script to each machine will cause the automatic onboarding of the device as a final step. SaltStack has a built in file server capability which allows files in the /srv/salt folder on the Master to be available to the Minions. Using this built in capability it is easy to distribute the onboarding file to each minion.
install_mde.sls:
copy_mde_onboarding:
  file.managed:
    - name: /etc/opt/microsoft/mdatp/mdatp_onboard.json
    - source: salt://mde/mdatp_onboard.json
    - required: install_mdatp
Including the required here ensure that the MDE package was installed first which also causes the /etc/opt/microsoft/ and other sub-folders to be created. This prevents the need for us to have to worry about creating those folders before copying the file here.
(Optional) SaltStack File Managed to Push MDE Configuration
Although not dicussed in this blog there is also an MDE Configuration file that can be pushed to each of the minions. Using a similar technique to the onboarding script you can push the configureation file as shown below.
install_mde.sls:
copy_mde_configuration:
  file.managed:
    - name: /etc/opt/microsoft/mdatp/managed/mdatp_managed.json
    - source: salt://mde/mdatp_managed.json
    - required: install_mdatp
Using the Salt State
Once the State File has been created you can now use the Salt state.apply command to enfore the desired state. Notice when applying the state the file extension is omitted from the state file because it uses . as a folder segmentation indicator in the event that you have nested state files.
> salt '*' state.apply install_mde
Assuming no typos or errors you should now have a valid state file that has successfully installed MDE, onboarded the device, and potentially pushed a desired configuration to each of your Linux machines.